|
|
|
 SPA
SOLAR WATER HEATER
SPA
SOLAR WATER HEATER
This panel was designed to assist my Spa's electric heater and not intended to replace it.
|
|
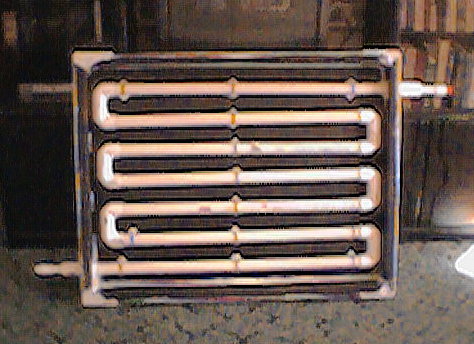
Picture on
left was taken prior to final painting. Flat black was used to optimize
efficiency. Panel size is 33 inches x 44 inches
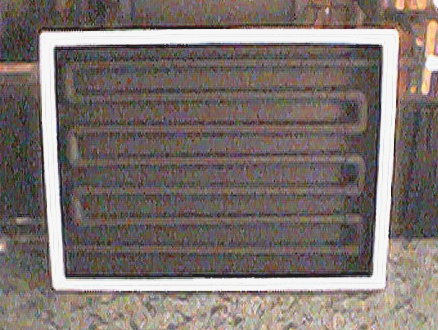
Picture on right is after painting and window seal installation. Note: This is a prototype type that is currently being tested in Arizona. Results will be posted when testing is complete. |
 |
|
Currently this panel is in its test phase. Heat tests have been performed with success. Now testing is being performed to determine the best way to circulate the most usable hot water. The pump being used now is a small 1.5 amp 120 VAC (60hz) similar to those used on small above ground swimming pools. A thermostat will also be incorporated into the system. |
| NOTE: In my search for a small simple trouble free thermostat I found a tiny military surplus device used to control radar transmitter temperatures. This ingenious device is something you've got to see. CLICK HERE to see a Picture and theory of operation. |
| PANEL ORIENTATION: For my test site the best panel orientation for a Flat-Plate Collector Facing South at Fixed Tilt=Lat+15. Which means, the panel faces South tilted at a 47° angle. For more information on optimum placement of your panel see http://solstice.crest.org/renewables/solrad/index.html |
| Quantity | Part(s) | Price | Source |
| 1 | 34" x 44" 1/2" ply wood | $4.95 | Home Depot |
| 3 ten foot lengths | 1-1/4" PVC water pipe | $8.98 | Home Depot |
| 12 | 1-1/4" elbow joints | $11.67 | Home Depot |
| 1 twelve foot length | 2" x 4" Lumber | $2.96 | Home Depot |
| 2 | 1-1/4" PVC to male garden hose adapter | $5.12 | Home Depot |
| 16 feet (25 cent per foot) | 1/2" clear vinyl hose | $4.00 | Home Depot |
| 2 | Female garden hose couplings | $2.74 | Home Depot |
| 1 pint | Flat black paint | $3.00 | Home Depot |
| 1 pint | PVC Cement | $1.47 | Home Depot |
| 34" x 44" | 1/8" plexiglas | $13.97 | Home Depot |
| 15 feet | Weather stripping to seal plexiglas | $6.50 | Ace hardware |
| 24 | Dry wall screws | $0.00 | Personal junk box |
| 8 | 4" wood screws | $0.00 | Personal junk box |
| 1 tube | Silicone calking | $1.99 | Home Depot |
| 1 dozen | 10" Zip Ties | $0.00 | Personal junk box |
| ASSEMBLY: The Frame was assembled with a 33" x 44" piece of ½" plywood with 2 by 4 sides using dry wall screws. 2" holes were cut in the left and right side 2 by 4’s to accommodate the inlet and outlet. All wood pieces were waterproofed prior to assembly. The PVC pipe was cut into 7 lengths, 5 pieces 36" and 2 pieces 41 ½". The two longer pieces were used for the inlet and outlet sections. The elbow joints were mated together with 2 ½ " sections of PVC. All PVC was sanded with 360 grit sand paper so the paint would stick. The PVC assembly was cemented together in the frame. The PVC plumbing was anchored to the plywood back with 10" Zip ties through 3/8" holes drilled on each side of each section of PVC. 12 zip tie anchors were used. Then the garden hose adapters were cemented to the inlets and outlets. All the panel seams were sealed with silicone caulking to make it as water tight as possible. Once the caulking was dry the entire assembly was primed and painted flat black. The paint was allowed to dry over night prior to installing the weather stripping. Two rows of ¾" weather stripping was used to seal the face of the panel. A piece of 1/8" 33"x 44" Plexiglas was then attached to panel face with ten ¾" sheet metal screws. A small rubber washer was used on each screw to aid in sealing. |
| TEST SITE LOCATION: 32° 18.01-N / 111° 19.18-W Elevation - 2134 Feet <Marana, Arizona USA> |
| TEST #001 : ((Feb 15, 2001)) Took the solar panel out today to do a leak & heat up test. First I set it out at about 45° and primed it with water. Getting the air out was harder than I expected. After it was purged of air bubbles I shut off the input valve. I screwed on a short piece of clear hose to the output fitting and had it pointing up about 3’ above the panel so I could monitor the water level while the sun heated the panel. It was a little cloudy today so the sun was in and out every few minutes. While a cloud was blocking out the sun the water level in the clear hose was about 10" above the output fitting. After a cloud had passed the sun was in full force on the panel. The water level in the clear hose climbed rapidly only after 15 seconds or less in full sunlight. I was surprised how quickly it reacted to the sunlight or lack thereof. Next I just let the panel sit in the intermittent sunlight for about 40 minutes then drained it so I could check to water temp. Without the Plexiglas cover to give a little greenhouse action and the outside temp just 75° the water temp still managed to get up to 126°. Looks like boiling point temps will be possible with this setup most of the year (Arizona). |
| TEST #002 :((Feb 18, 2001)) Getting air out of the panel plumbing seems to be a significant problem. The only way I could completely remove all the air was to attach the panel output hose to the Spa suction intake line. Once all the air was removed I allowed to panel to heat so temp and flow rate could be measured. The panel produced a decent amount of HOT water but I was disappointed in the rate of flow. Given todays temp (80 F) the panel produce a max temp of (143 F) yet the flow rate was less than .33 GPM. I suspect the poor flow rate is due to the high Spa temp of 100 F. Since the weather here in Arizona is still cool the flow rate may very well increase with 100+ temps in the summer. But... With the panel producing usable heat at 78 F the incorporation of a small in-line pump would stand to increase over all effectiveness. I'll take a look at some small pumps similar to those used for small outdoor fountains. |
| TEST #003: ((Feb 26, 2001)) Test conducted with the 1.5 AMP 120 VAC pump worked well but the pump proved to be over kill. Now we're going to try a much smaller 12 VDC pump and aim for max flow with minimum pump power consumption. As soon as this cloudy weather passes I'll post results... |
| TEST #004: ((Mar 01, 2001)) Finally a sunny day! The small 12 VDC pump is working just fine kicking on when water temp reaches 125 F°. The first big problem I noticed is the Plexiglas cover is expanding too much causing buckling and seal breach. So, I'll replace the Plexiglas with a Glass cover but this time the glass will be inserted within the frame and not on top. As far as performance goes, it's a cool partly cloudy day just 68 F° yet the pump is kicking on every 23 minutes and pumping 2 gallons of 120+ F°. Looks like this set up will work great in Arizona clear HOT summer days. |
|

|
Questions? Comments? -----> Grohas@Qwest.net